DMS
Fixed and portable DMS are represented by the on the action panel. You can use the ATMS to:
- View the status and current message of a sign
- Post a message to a sign
- Remove a message from a sign
- Post a message to multiple signs
- Remove a message from multiple signs
- Schedule a message for display on one or more signs
- Manage a library of messages for the signs
- Manage a list of Approved Words for the signs
The ATMS manages a queue of messages for each sign, some of which have been added by users, and others that have been generated automatically based on conditions. When there are multiple messages in the queue for the sign, the highest priority message will be displayed. The sources and typical priorities of messages are as follows:
| MESSAGE SOURCE | DESCRIPTION |
|---|---|
| Manual | A message posted by you or another user to one or more signs for immediate display. These messages will be sent to the sign for display regardless of what other messages are in the sign's queue. |
| High severity event | A message included in a high severity event response plan that has been approved by a user. |
| Medium Severity event | A message included in a medium severity event response plan that has been approved by a user. |
| Travel Time | Generated by the ATMS Travel Time Manager and updated automatically as new traffic data is collected |
| Pre-warning messages or low severity events | A message included in an event response plan or advance plan that has been approved by a user. |
| Scheduled/PSA | A message scheduled for display by you or another user. The message is added to the sign's queue at the start of the scheduled period, and removed at the end of the period. It will only be displayed if it is the highest priority message in the queue during that time. |
| Default | The message configured for display when no other message is in the queue. |
Turn the Sign Layer On or Off
To turn the sign layer on or off, click the on the action panel. When the sign layer is displayed, the icon is highlighted.
Sign Icons
The sign icons indicate the status of each sign, whether the sign is being used to display a message, and the relative priority of the displayed message. The sign icon comes to a point, indicating where the sign is located, and which direction of the road it displays messages for. The sign icons you will see are as follows:
| ICON | DESCRIPTION | DIRECTION OF TRAVEL |
|---|---|---|
| Blank: An all-black sign indicates that the sign is displaying its default message, and that the default message is blank. The direction of this icon indicates that it is for the Southbound direction of the road. | South | |
| Low Priority: A sign with a single line of dots indicates a default or low-priority message is displayed. This typically represents a non-blank default message or a scheduled message. | East | |
| Medium Priority: A sign with two lines of dots indicates a medium priority message is displayed. This typically represents a travel time or low-medium severity event response message. | West | |
| High Priority: A sign with three lines of dots indicates a high priority message is displayed. This typically represents a high severity event response message or a manual message. | Southwest | |
| Error: A sign with a red border indicates the sign is not communicating or has an error preventing the ATMS from controlling it. | Northeast | |
| Disabled: A grey sign face indicates that the sign has been disabled by a user. The ATMS will not communicate with a sign while it is disabled and will have no information about the current message or status of the sign. | East | |
| PCMS: This icon indicates that this sign is a Portable Changeable Message Sign. | South |
View Current Message on Sign
Click on the map icon for a sign to open a window showing the current message it is displaying. The window is tethered to the sign icon it belongs to.
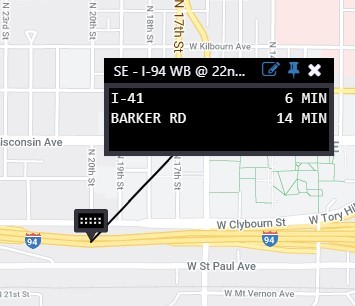
Click the icon to open the properties screen for the sign.
Click the /
icon to pin or unpin the window on the map. If the pin is pointing down, the window will stay in a fixed position on your screen as you pan the map. If the pin is pointing to the side, the window will move with the map.
Click the icon to close the window.
Click and drag on the window title to reposition the window.
This window updates automatically whenever the sign's current message or status changes.
Message Windows
Show message windows gives an option to automatically show/hide message pop-up windows for signs based on the type of message they are displaying. For example, if a user selects for pop-ups to show for all signs with Manual or Smart Corridor messages, the system should automatically open a sign's pop-up window if a Manual or Smart Corridors message is posted to one of them, and then close again when the Manual or Smart Corridor message is dequeued.
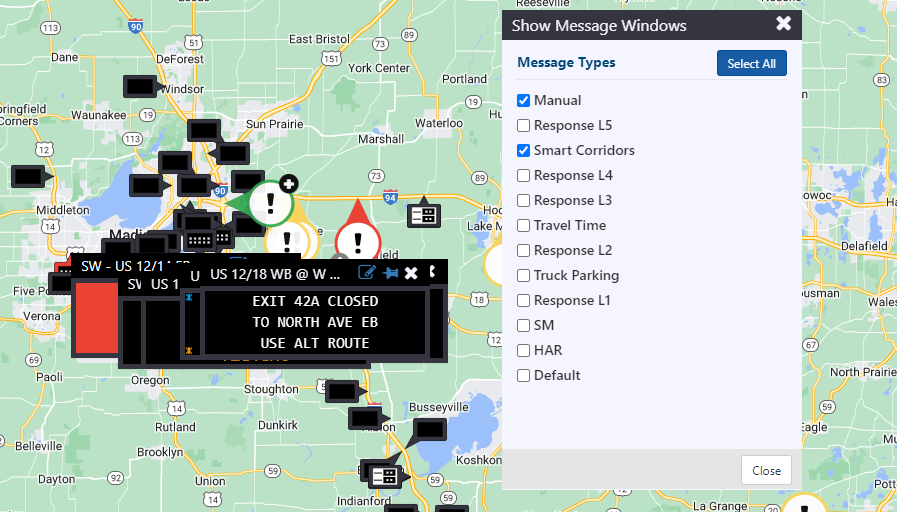
If sign pop-up is opened manually, then pop-up should remain open even if the message posted to the sign doesn't match the selected message types. If the sign pop-up is closed manually, it should remain closed until the next time a message matching the criteria is posted to the sign or the user reloads the map view.
View the Sign List
To open a list of all signs configured in the ATMS, right click on the DMS icon on the action panel and select the Sign List option.
Click the 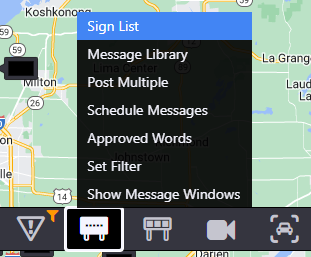
The sign list indicates:
- The status of each sign
- The current highest priority message for each sign and
- The source of each message (Manual, Response, Travel Time, Scheduler or Default)
Click the 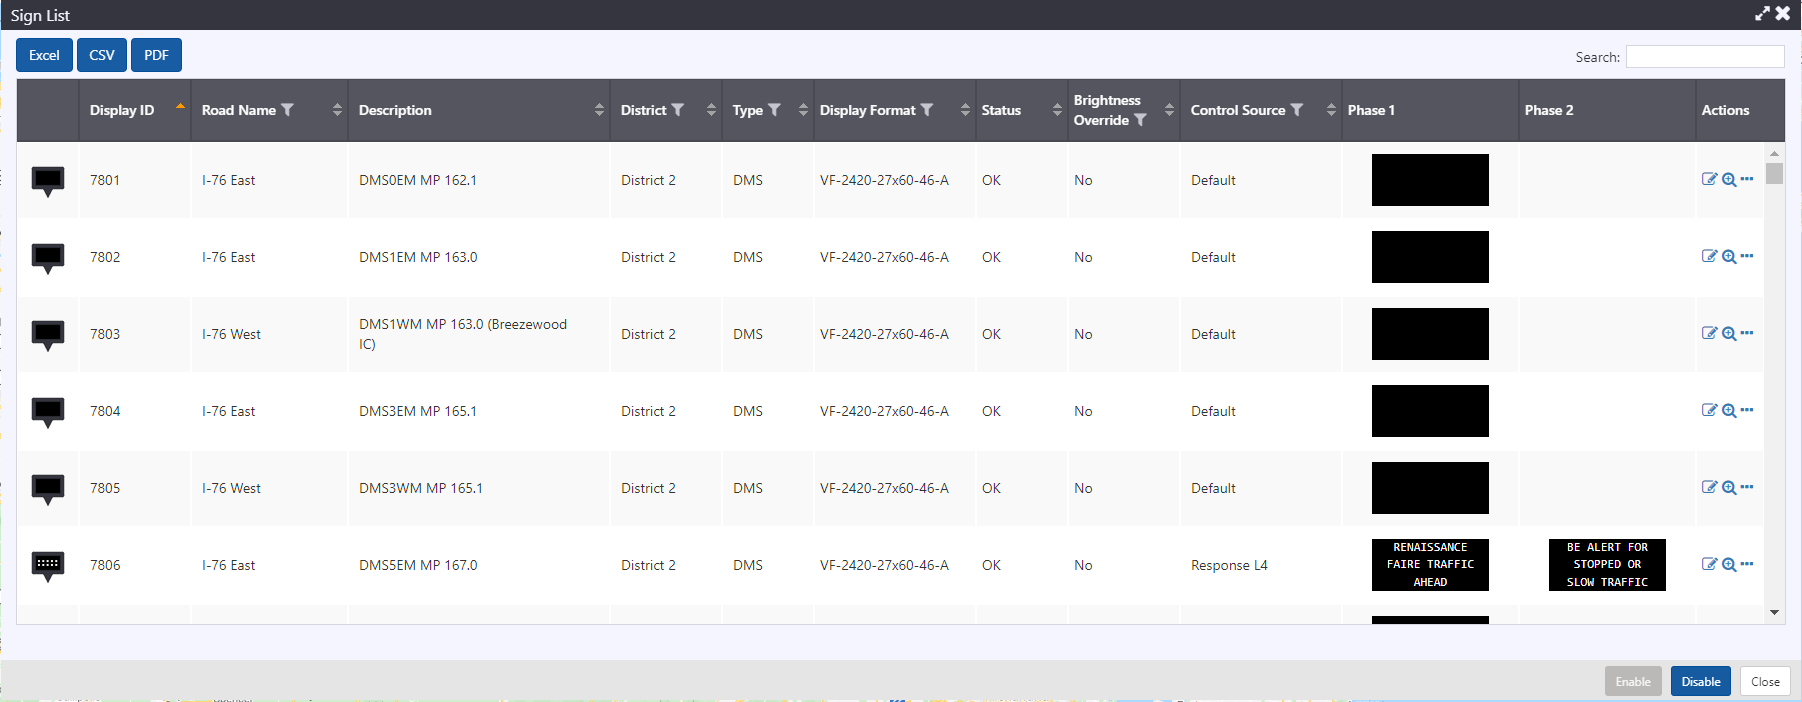
Each row contains a set of buttons that can be used to manage the sign.
| BUTTON | ACTION |
|---|---|
| Open sign properties screen | |
| Center the map on the sign | |
Open Menu with options to
|
Search for a Sign
You can search the sign list using the Search box at the top right of the window. See section Search a list for more details.
Sort the Sign List
You can sort the list by the icons in its header. See section Sort a list for more details.
Manage a Sign
The Sign Properties view provides access to more detailed information about a sign, and to sign control features. To open the Sign Properties view for a sign, you can either:
- Right click on the map icon of the desired sign and select Properties
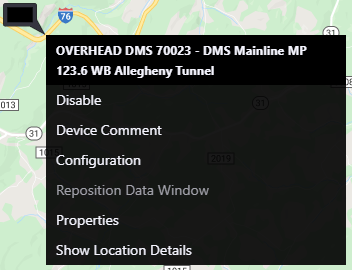
- Click on the
button for the desired sign in the Sign List
The properties view includes a fixed portion at the top that displays the sign's status and current message. It also provides options to:
- Enable or Disable communication with the sign
- Status Poll : initiates a sign connection to retrieve the current message and then update the status time field
- Release Control : if a Manual message has been sent to the sign, this will remove it
The rest of the properties view is divided into tabs:
- Control : Post a message to the sign
- Message Queue : View and manage the sign's queue of messages
- Details : View some sign configuration information and detailed error messages
- Settings : Update sign settings such as sign brightness
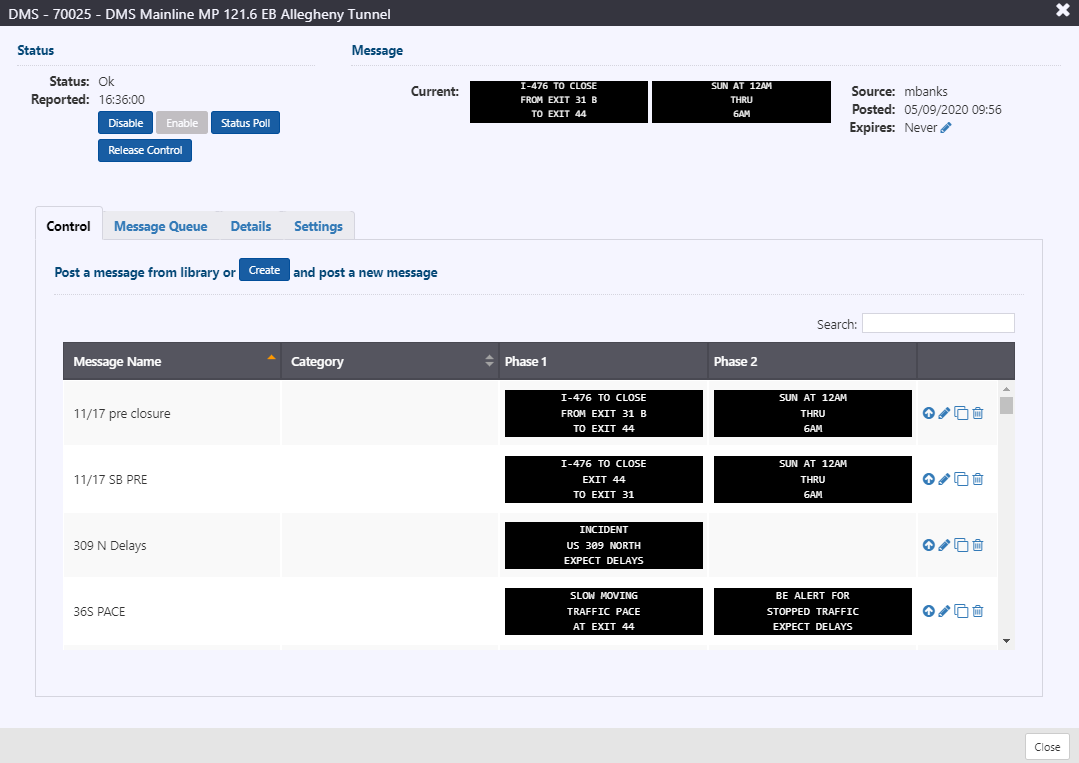
Post a Message from the Library
You can post a previously saved library message to the sign from the Control tab of a sign's properties view. The Control tab includes a view of the message library for the selected sign. You can use the Search box to find a message by name and/or category.
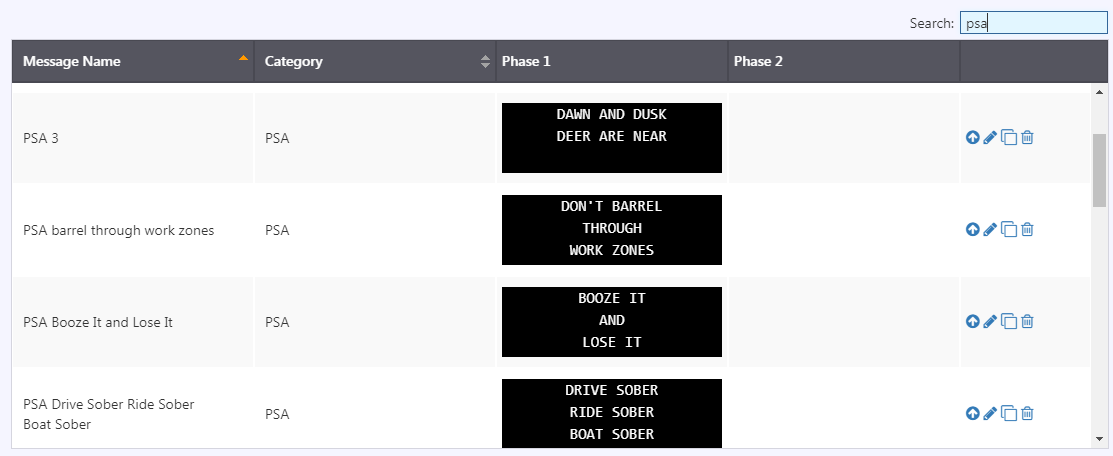
Click the button next to the desired message to post it. The ATMS will open a confirmation screen that includes options to:
- Set a Duration for the message. A message with a duration of 0 hours and 0 minutes will remain on the sign indefinitely.
- Indicate whether this message should be allowed to merge with other messages. This will only be visible if the message is eligible to merge (see section Message Merging for details).
Post a New Message
You can create and post a new message to the sign from the Control tab of a sign's properties view. Click the Create button shown below to open the Message Editor.

Select the type of message you would like to create: Text Only or Pictogram (the pictogram option will only be available for signs that can display pictograms.

Enter the desired message text, optionally include pictograms or background images, and enter a message name and a category. You can optionally add a second or third phase to the message using the Add Phase button. To remove the phase, click the Remove Phase button.
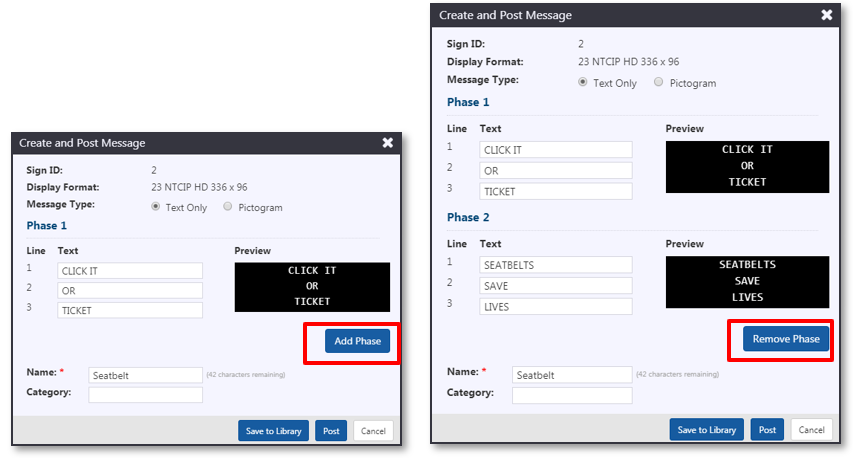
The ATMS validates each message as you are creating it. A message is invalid if:
- One or more lines are too long to fit on the sign
- It contains one or more words that are not included in the ATMS Approved Words list (see section Manage Approved Words ). Approved word can also be added by clicking on the underlined word from the Error message modal.
- It does not have a name
If a message is invalid, the Save to Library and Post buttons are disabled, and the ATMS displays error messages about lines that are too long or that contain non-approved words.
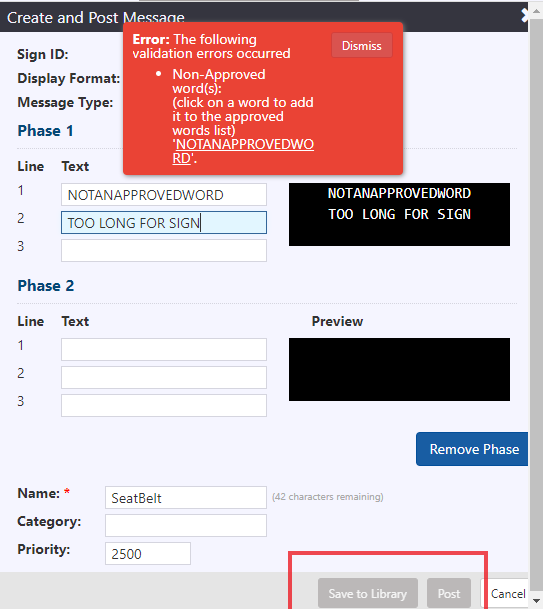
When a message is valid, click Save to Library to optionally save the message to the library, and make the message available to other signs of the same type. Messages must have a name before they can be saved to the library, and can have an optional Category. To enter a category, either type the desired category name, or select from a list of previously entered Categories. The Category list is filtered based on the entered text.
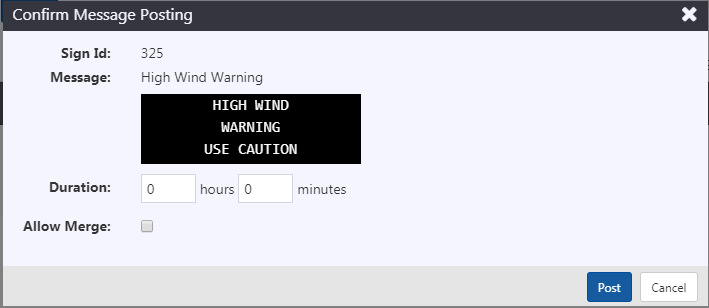
Click Post to post the message. The ATMS will open a confirmation screen that includes options to:
- Set a Duration for the message. A message with a duration of 0 hours and 0 minutes will remain on the sign indefinitely.
- Indicate whether this message should be allowed to merge with other messages. This will only be visible if the message is eligible to merge (see section Message Merging for details).
Pictogram Messages
To create a message that includes pictograms, background images or color and/or colored text, select the Pictogram message option on the message editor.
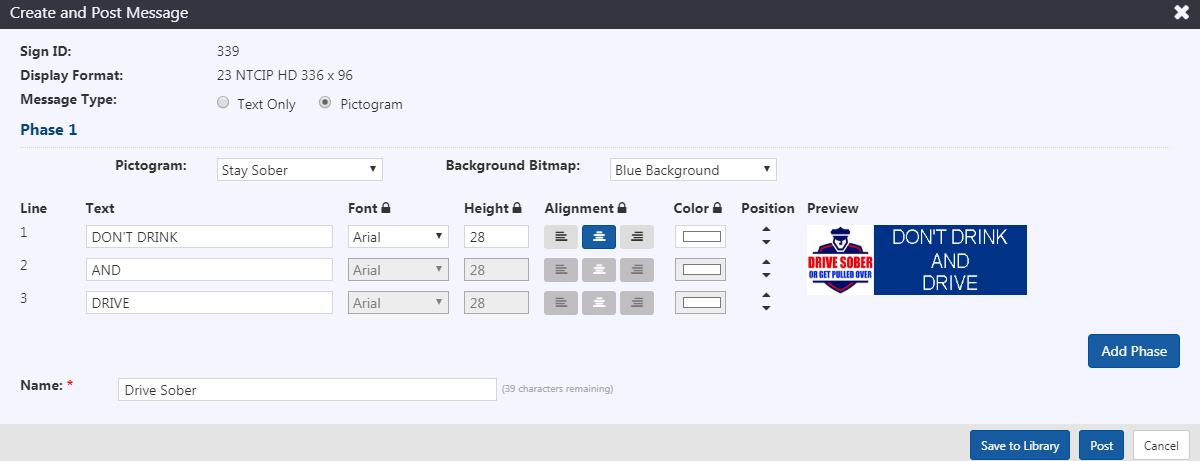
You can optionally include two different types of images in a message:
- Pictogram : displayed on the left side of the message. Text position adjusts automatically based on the pictogram width
- Background Bitmap : used to modify the background color, to create a message using a graphic created outside of the ATMS, or to add headers/footers to a message. Text is written overtop of the image.
You can adjust the selected font, font size, font alignment, font color and vertical position of each line. By default, the editor applies the style applied to the first line of a message phase to all lines of that phase. To use a different font, font size, text alignment or color for a line, click the button next to the property you wish to change to unlock it.
To revert to the styling used on the first line, click the button to lock it again.
Remove a Manual Message
To remove a manual message from a sign, click Release Control on the header of the sign properties view. You will be asked to confirm that you would like to remove this message from the sign.

Edit Manual Message Expiry
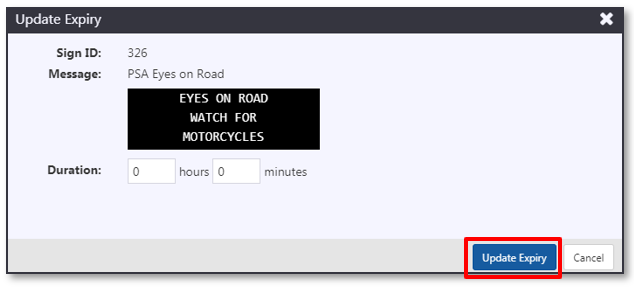
To edit the expiry of a manual message, click on the button next to the message expiry.

Enter the target duration of the message (starting from the current time) and click Update Expiry. A message with a duration of 0 hours and 0 minutes will remain on the sign indefinitely.
Manage Message Queue
To view the current target message, and queue of messages the ATMS is managing for a sign, click the Message Queue tab on the sign's properties view.
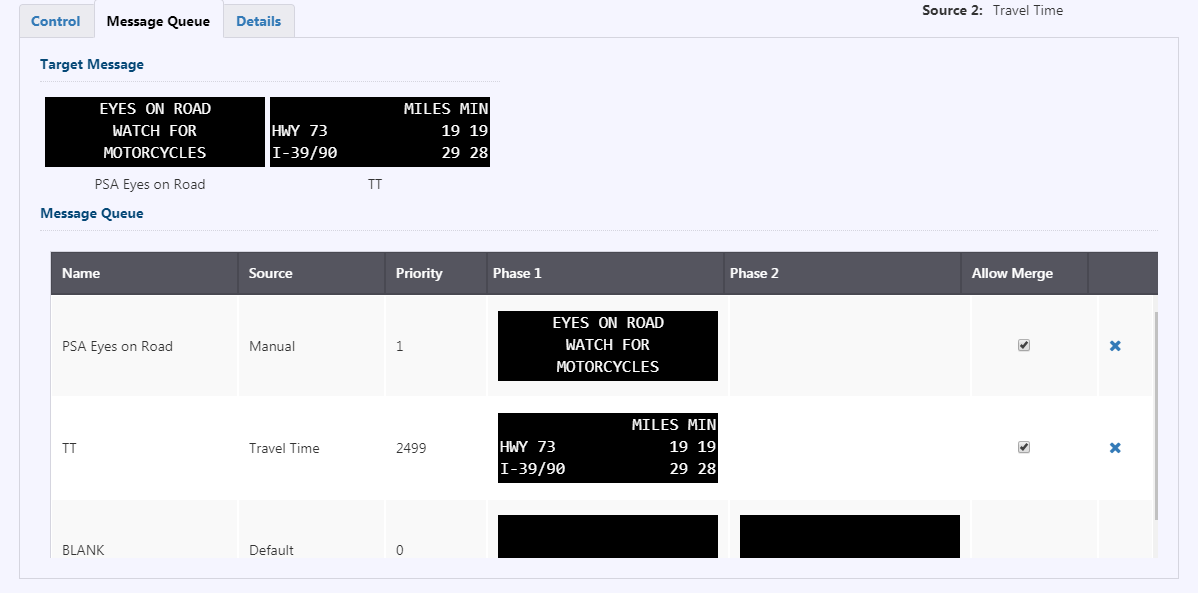
The Target Message is the message the ATMS thinks should be on the sign based on the priority of all queued messages, and may be a combination of multiple messages from the queue if messages are allowed to merge (see section Message Merging ).
The Message Queue shows all messages that have been submitted to the sign and indicates the name and source of the message. The queue is sorted to show the highest priority messages on top.
To allow/disallow a message to merge with another message in the queue, click the checkbox in the Allow Merge column.
To remove a message from the queue, click the button in the last column. The Default message cannot be removed. Note that the ATMS may re-add a message to the queue that was previously removed, as identified below.
Messages are prioritized firstly by source, and then by numerical priority within each source. Message source prioritization is configured by deployment; however the sources usually include the following in roughly this order:
| MESSAGE SOURCE | BEHAVIOR |
|---|---|
| Manual | Message will not be re-added to the queue |
| Response | Message may be re-added to the queue if a user re-approves the DMS portion response plan it was generated for. Multiple response bins are included, with Response L1 to L6 being available. Typically, different response bins are used to prioritize different event messaging type. For example, Response L1 may be configured as the lowest response message source priority, below Travel Time, and used only for planned event advance messaging as an agency might deem that messaging lower priority than other event messaging and travel time. |
| Travel Time | ATMS will add a new travel time message at the next interval unless travel time signing is disabled for the sign. |
| Scheduled | If the message was added as part of a recurring schedule, the message will be re-added to the queue at the start of the next scheduled display period. To remove the message permanently, either delete the schedule, or remove the sign from the schedule. |
Within each source, messages are prioritized by their numeric priority. This is an editable field for all manually created messages, and a priority is calculated for system-generated response messages using a configurable base value associated with each template.
View Error Details
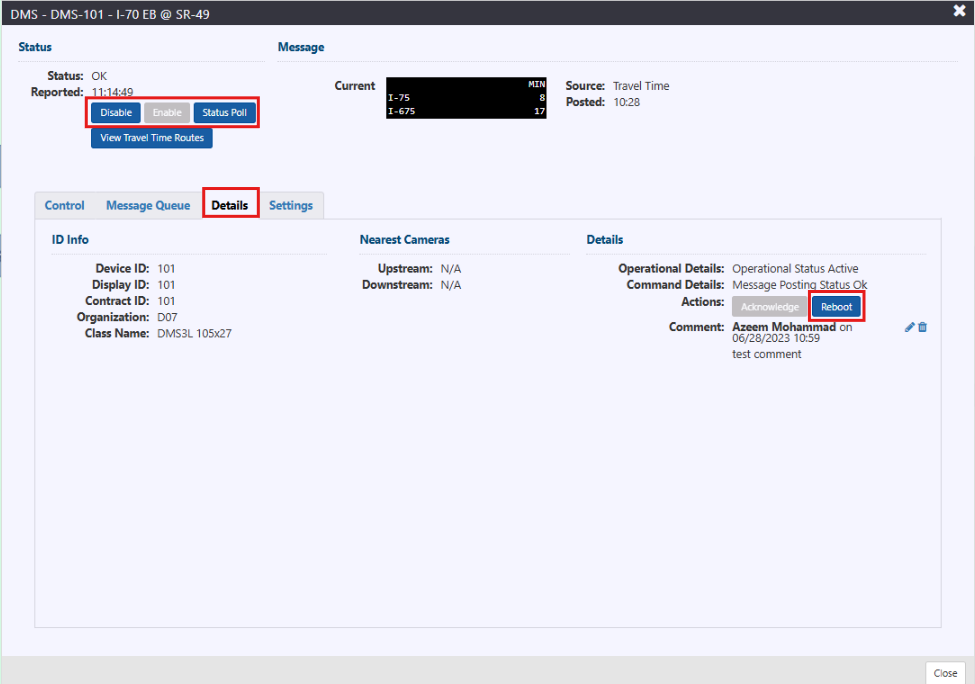
To view the details of any error message reported by the sign, click on the Details tab on the sign's properties view. The Operational and Command details will describe any errors returned during the most recent status poll and attempt to post a message to the sign respectively.
View Device Details
To view additional details about a sign, including how it is identified in other systems, and its Class Name (identifies the size and capabilities of the sign), click on the Details tab. For signs configured with the NTCIP protocol, the system provides the option to send a Reboot command. Users can also add or update comments for any sign.
Update Sign Brightness
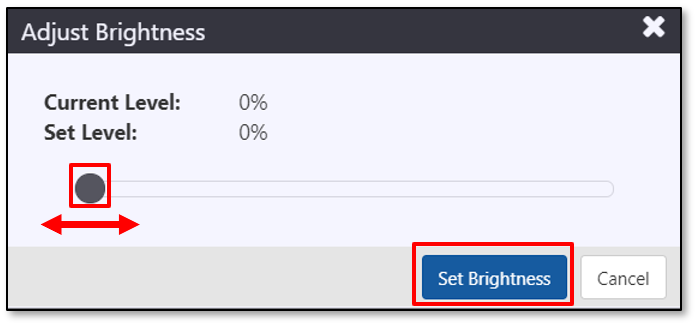
To update the brightness of a sign, click on the Settings tab. Under Sign Brightness, it reports the current brightness settings. Click Override, then drag the slider to adjust the Set Level brightness percentage. Click Set Brightness to update the sign's brightness level.
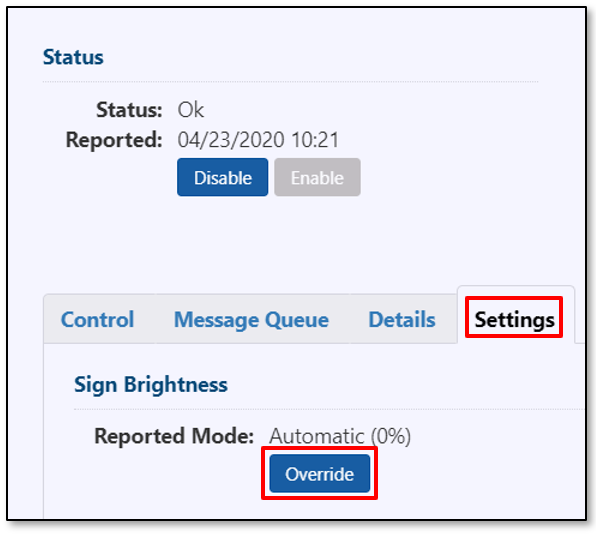
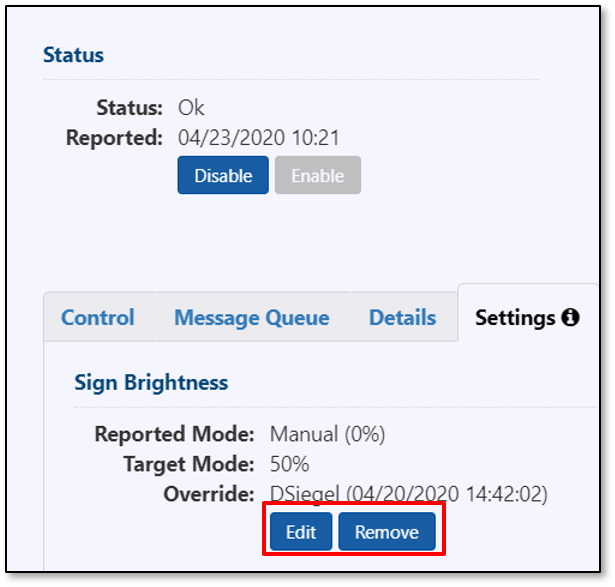
If there is already an override in place, it can be edited by clicking Edit or can be removed by clicking Remove.
Sign Diagnostics
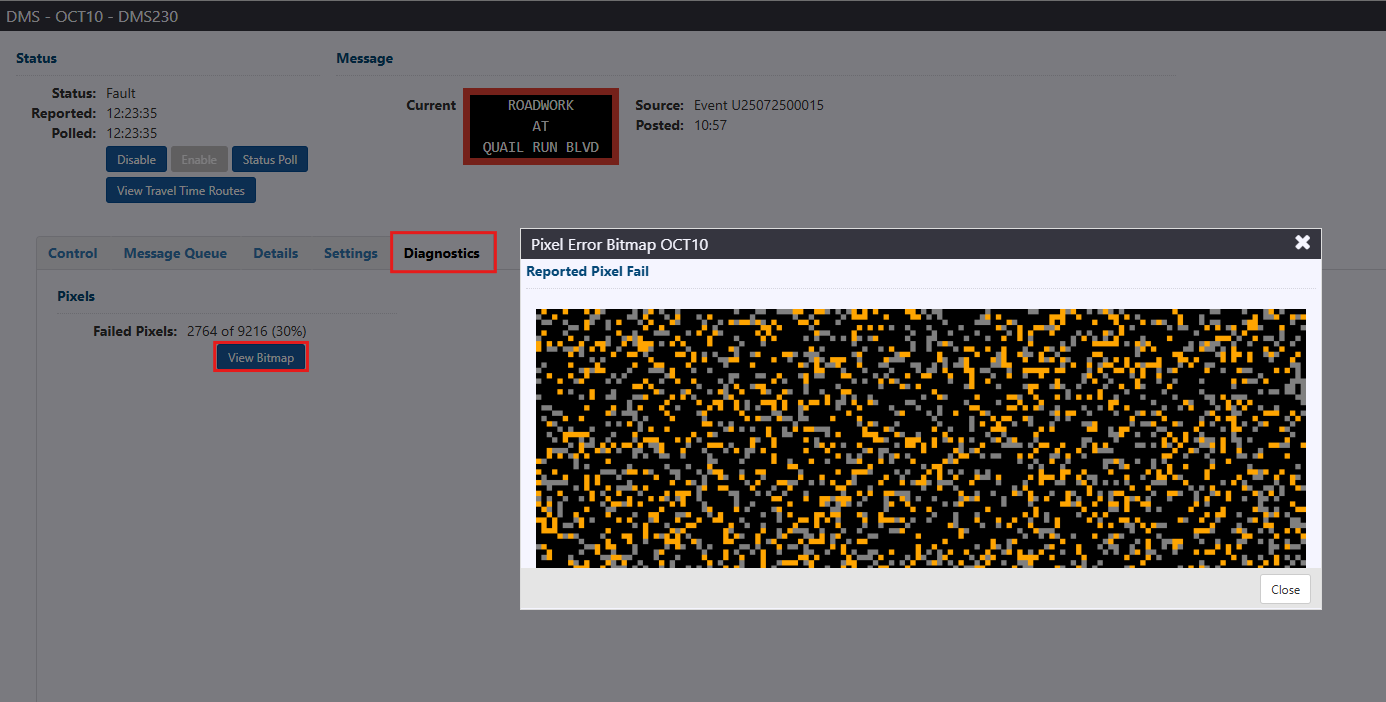
To view any Pixel Error or Power issues reported by sign, click on the Diagnostics tab.
Pixel error can be seen for a fault sign in error mode. Click on View Bitmap button to view the Pixel error bitmap.
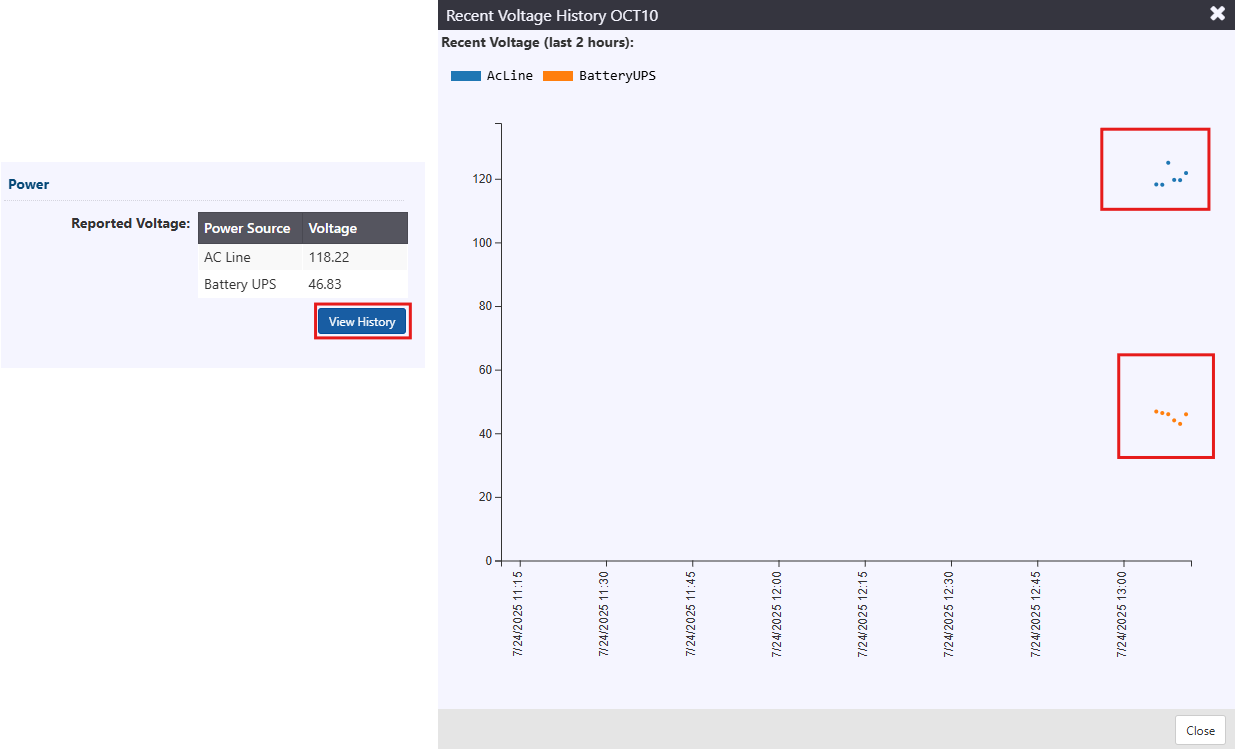
To view the Reported Power Voltage, click on the Diagnostics tab. Power Source and Voltage is displayed for the fault sign. Click View History button to view the Recent Voltage History at the configured interval of time.
Manage Multiple Signs
The Post Multiple screen can be used to manage posting or removing a manual message from multiple signs. These are high priority messages that will replace what is currently displayed on the included signs. Note that Event Response plans and scheduled messages are expected to be the primary features used to post a message to multiple signs. This feature is designed to handle cases where a message must be posted immediately but is not in relation to an event managed within the ATMS.
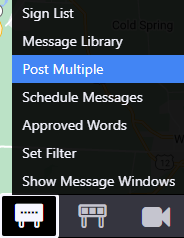
To access the post multiple screen, right click on the DMS icon on the Action Panel and select Post Multiple.
The top of the screen contains a list of all active manual messages that have been posted to multiple signs, with options to remove the message or modify its expiry.
The bottom of the screen provides options to activate a pre-built Message Plan from the library, or to create and post a new plan. A Message Plan identifies:
- A message in the sign library (identified by name)
- A set of signs that will receive the message : these signs must all have a message by that name in the libraries for their respective Display Classes
The Message Plan Library also provides options to edit or delete message plans.
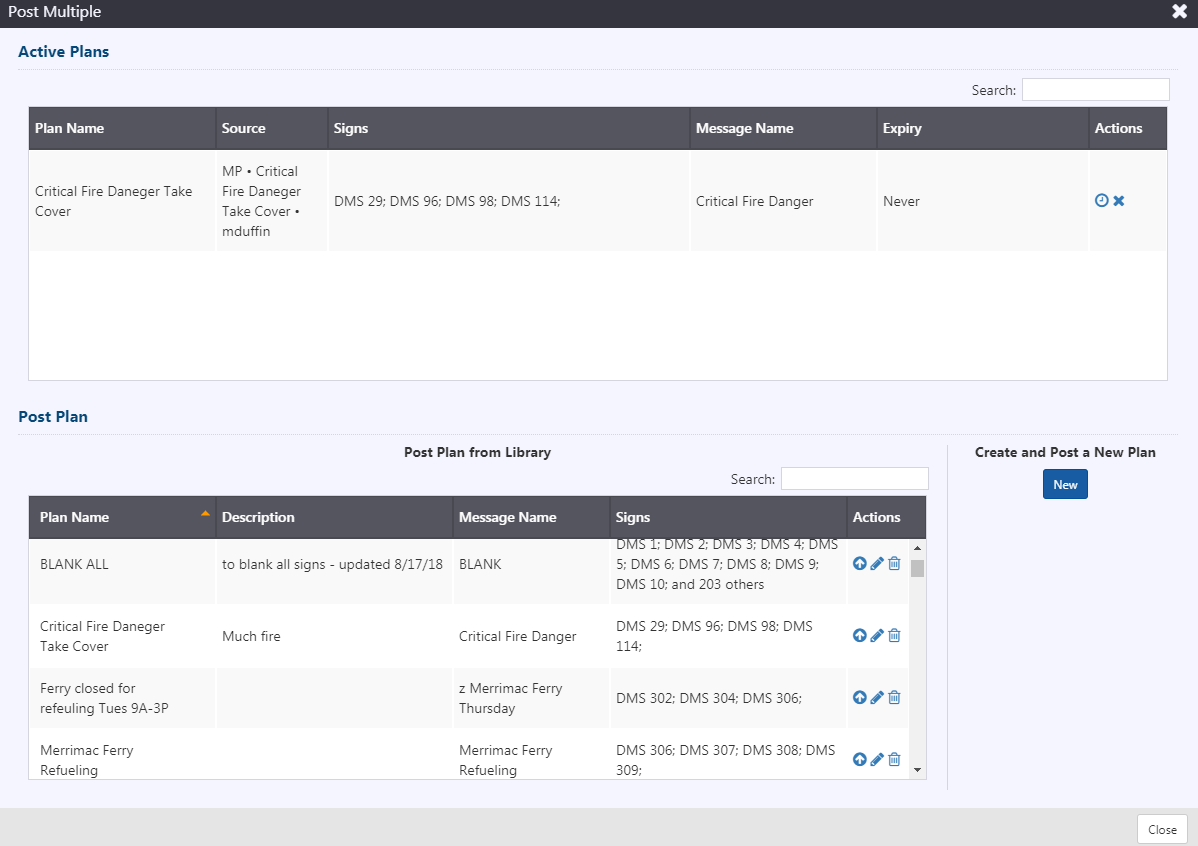
Post a Message Plan from the Library
You can post a previously created Message Plan from the library of message plans from the Post Multiple screen. You can use the Search box to find a message name by name, description, message name or sign.
Click the Post button to Post the Message Plan. The ATMS will open a confirmation screen that includes options to:
- Set a Duration for the message. A message with a duration of 0 hours and 0 minutes will remain on the signs indefinitely.
- Indicate whether or not this message should be allowed to merge with other messages on each of the signs that are part of the plan. This will only be visible if the message is eligible to merge (see section Message Merging for details)
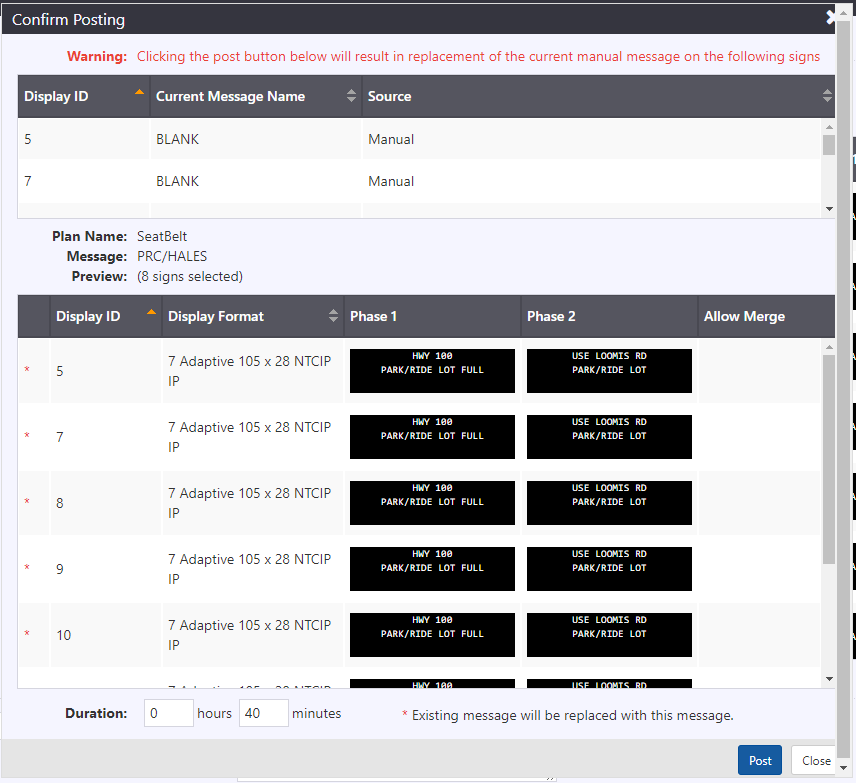
Click Post to finish posting the message to all selected signs.
Create and Post an Ad-Hoc Message Plan
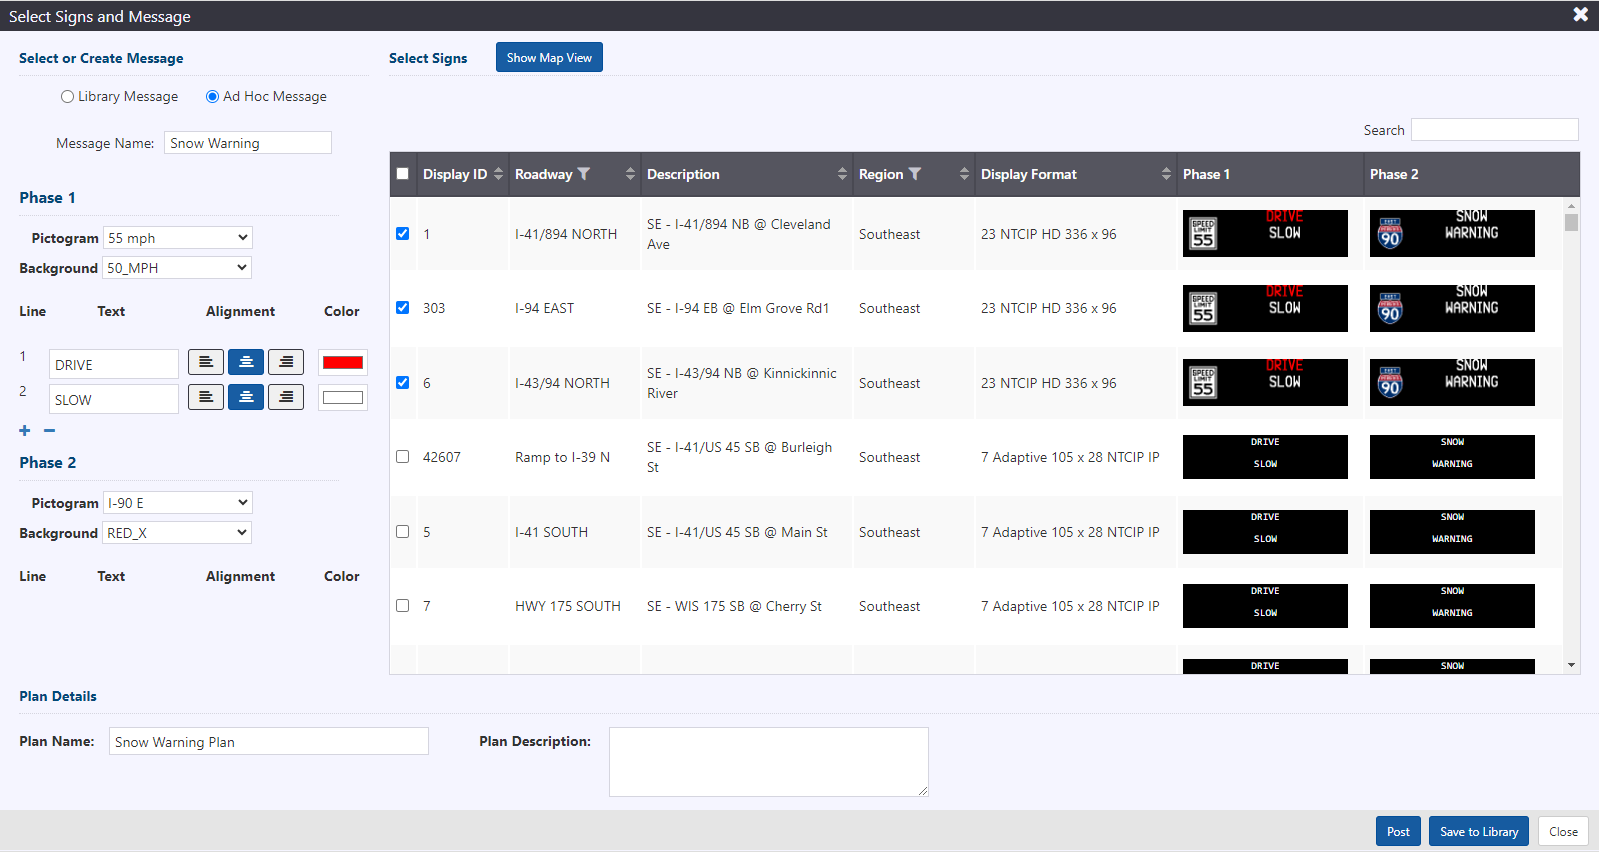
To post a message to a set of signs that aren't already captured by a message plan, click the New button under Create and Post a New Plan.

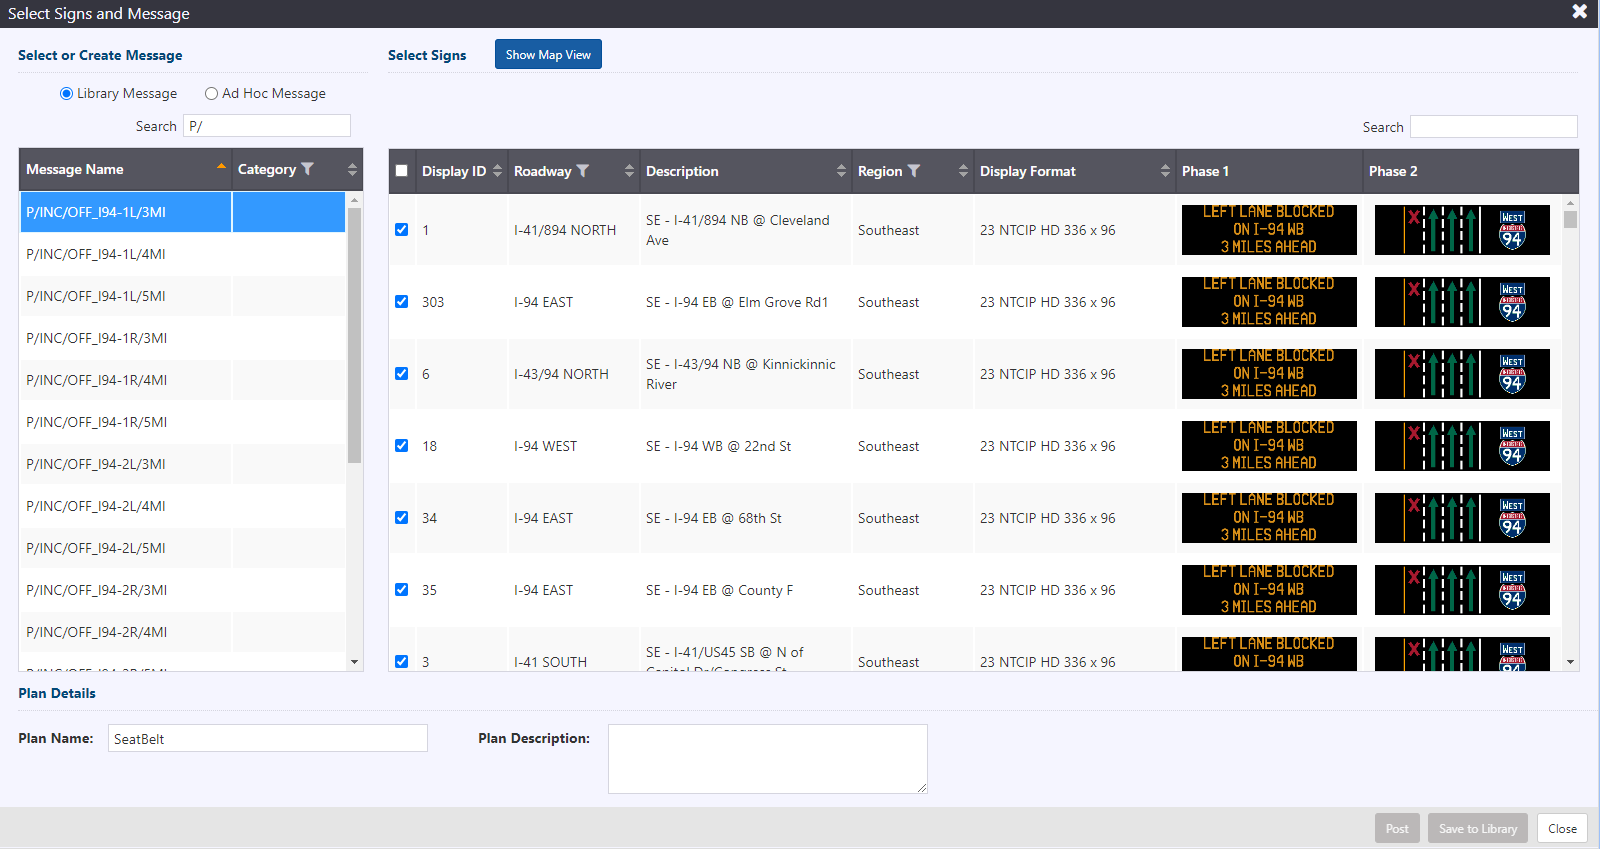
To define a plan, click on the Ad Hoc Message radio button. Enter a Message Name.
Enter the text for Phase 1. Select the Pictogram and Background from the dropdown. You can adjust the selected font alignment, font color of each line. By default, the alignment is set to center and color to white. Select + to add more line and - to remove line text.
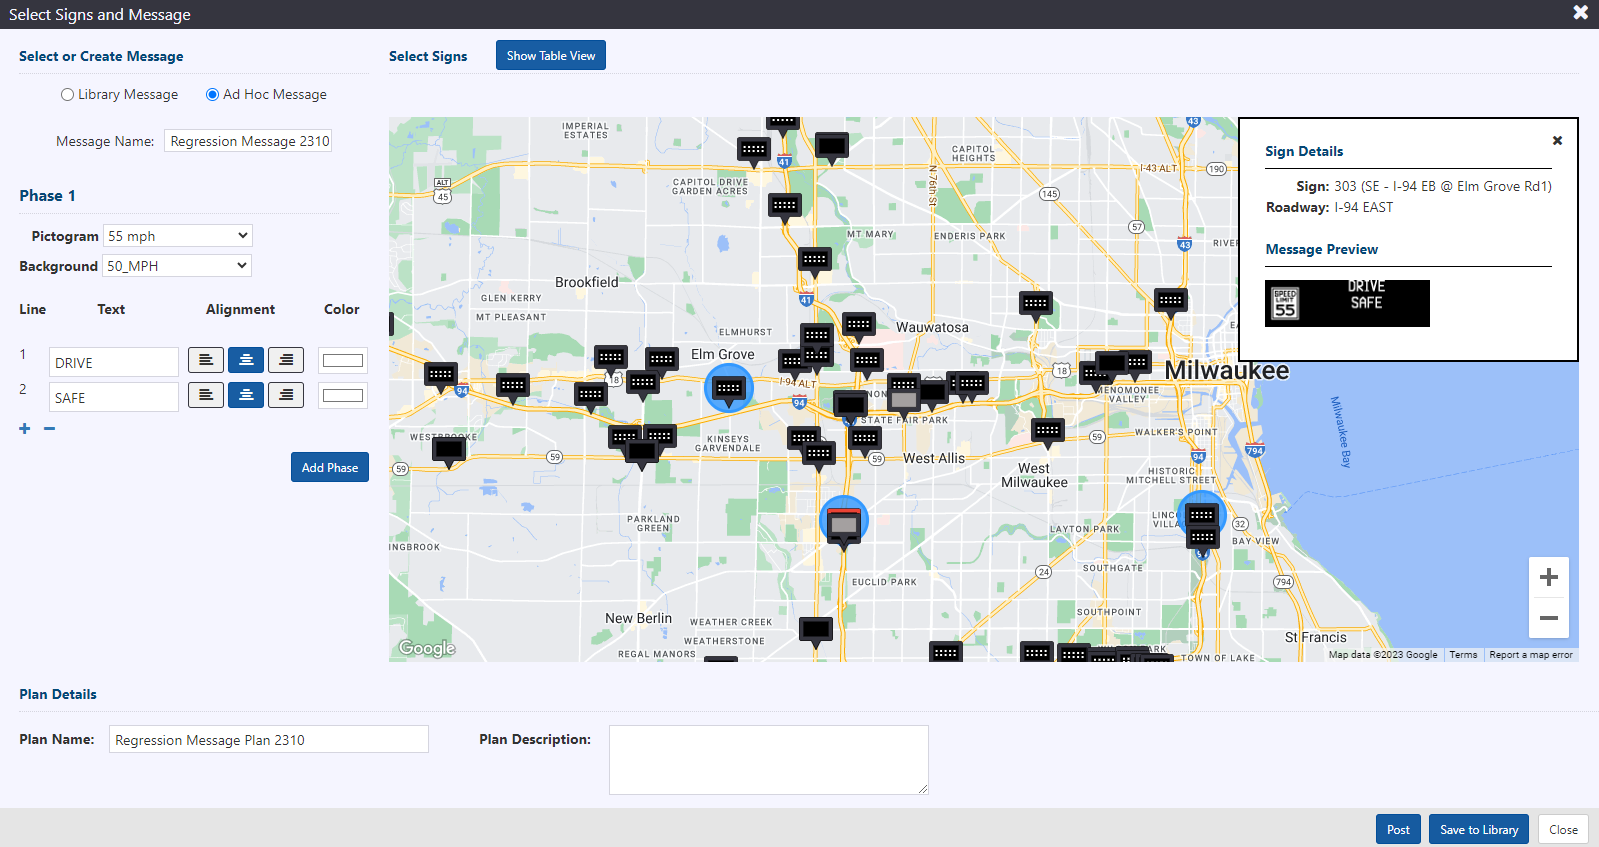
Click on the Add Phase button to add phases. You can add as many phases as the sign's display format is configured to support. This is typically two, but may be 3-4 for some sign types.
Map view:
After selecting the desired message and signs, enter a Plan Name : this will be used to identify this multi-sign posting for later adjustment or removal. Optionally enter a description of the plan.
Click Save to Library to optionally save the Message Plan to the library for later use.
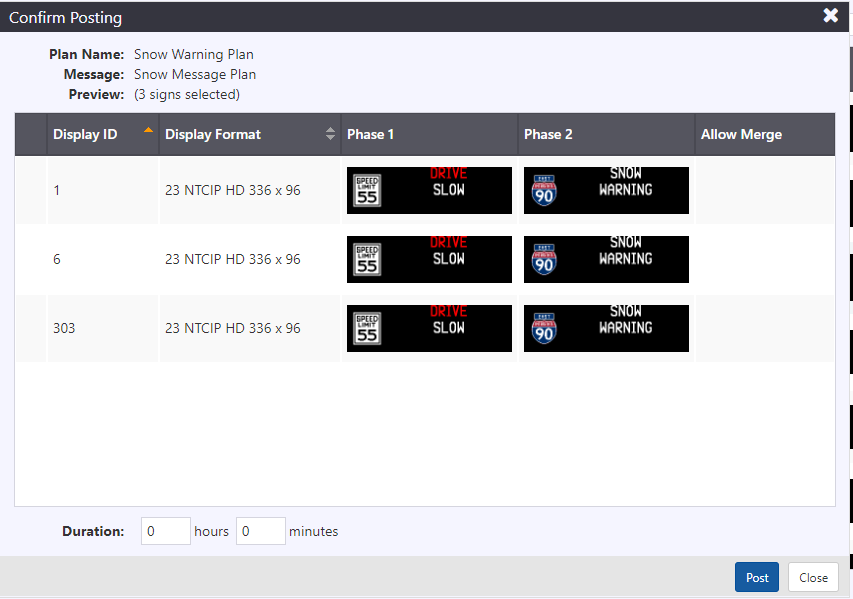
Click Post to post it. The ATMS will open a confirmation screen that includes options to:
- Set a Duration for the message. A message with a duration of 0 hours and 0 minutes will remain on the signs indefinitely.
- Indicate whether or not this message should be allowed to merge with other messages on each of the signs that are part of the plan. This will only be visible if the message is eligible to merge (see section Message Merging for details)
Remove a Message from Multiple Signs
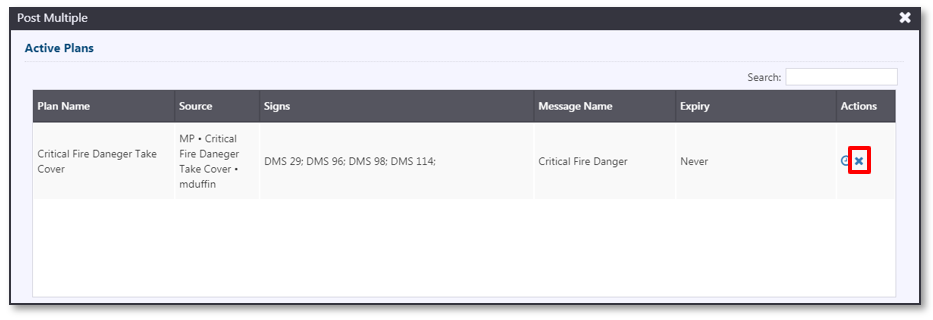
To remove a message that was posted to multiple signs, open the Post Multiple view and click the button next to the plan that should be removed. You will be asked to confirm that you would like to remove this message from the signs.
Change the Expiry of a Message Posted to Multiple Signs
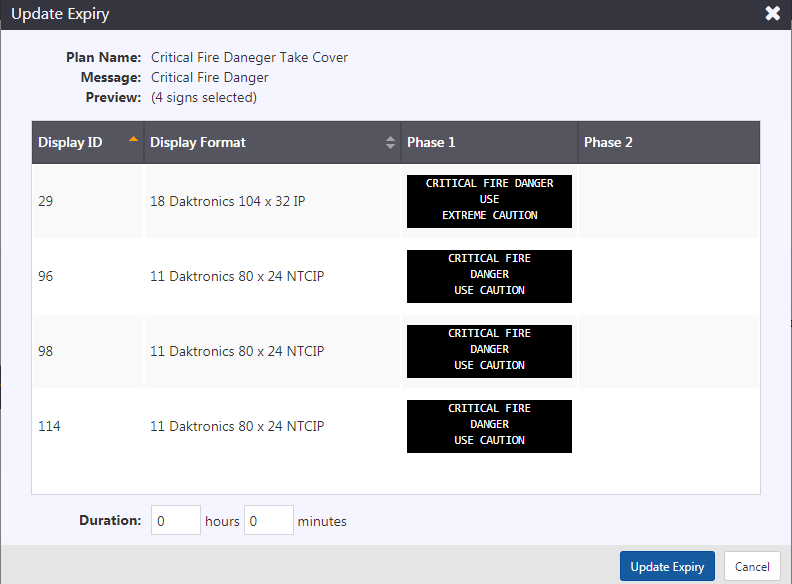
To edit the expiry of a manual message, click on the button next to the message expiry.
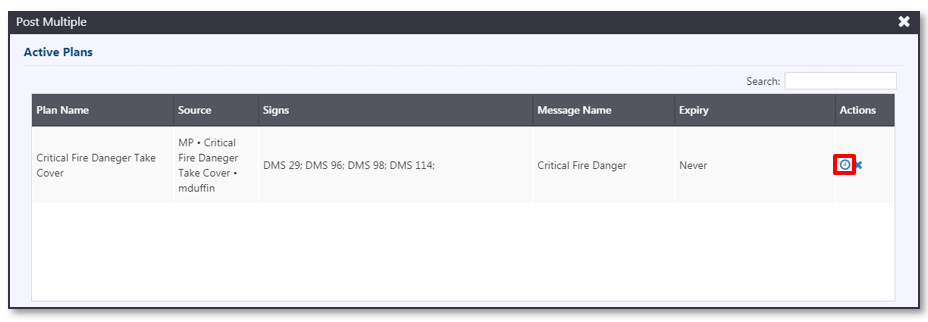
- Enter the target duration of the message (starting from the current time) and click Update Expiry. A message with a duration of 0 hours and 0 minutes will remain on the signs indefinitely.
Schedule Messages
The Schedule Messages screen can be used to schedule a message for one or more signs. These are lower priority messages that will only be displayed during their scheduled activation times if there are no higher priority messages, such as Manual or Response messages, in a sign's queue.
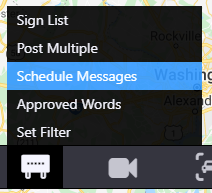
To access the Schedule Messages screen, right click on the DMS icon on the Action Panel and select Schedule Messages.
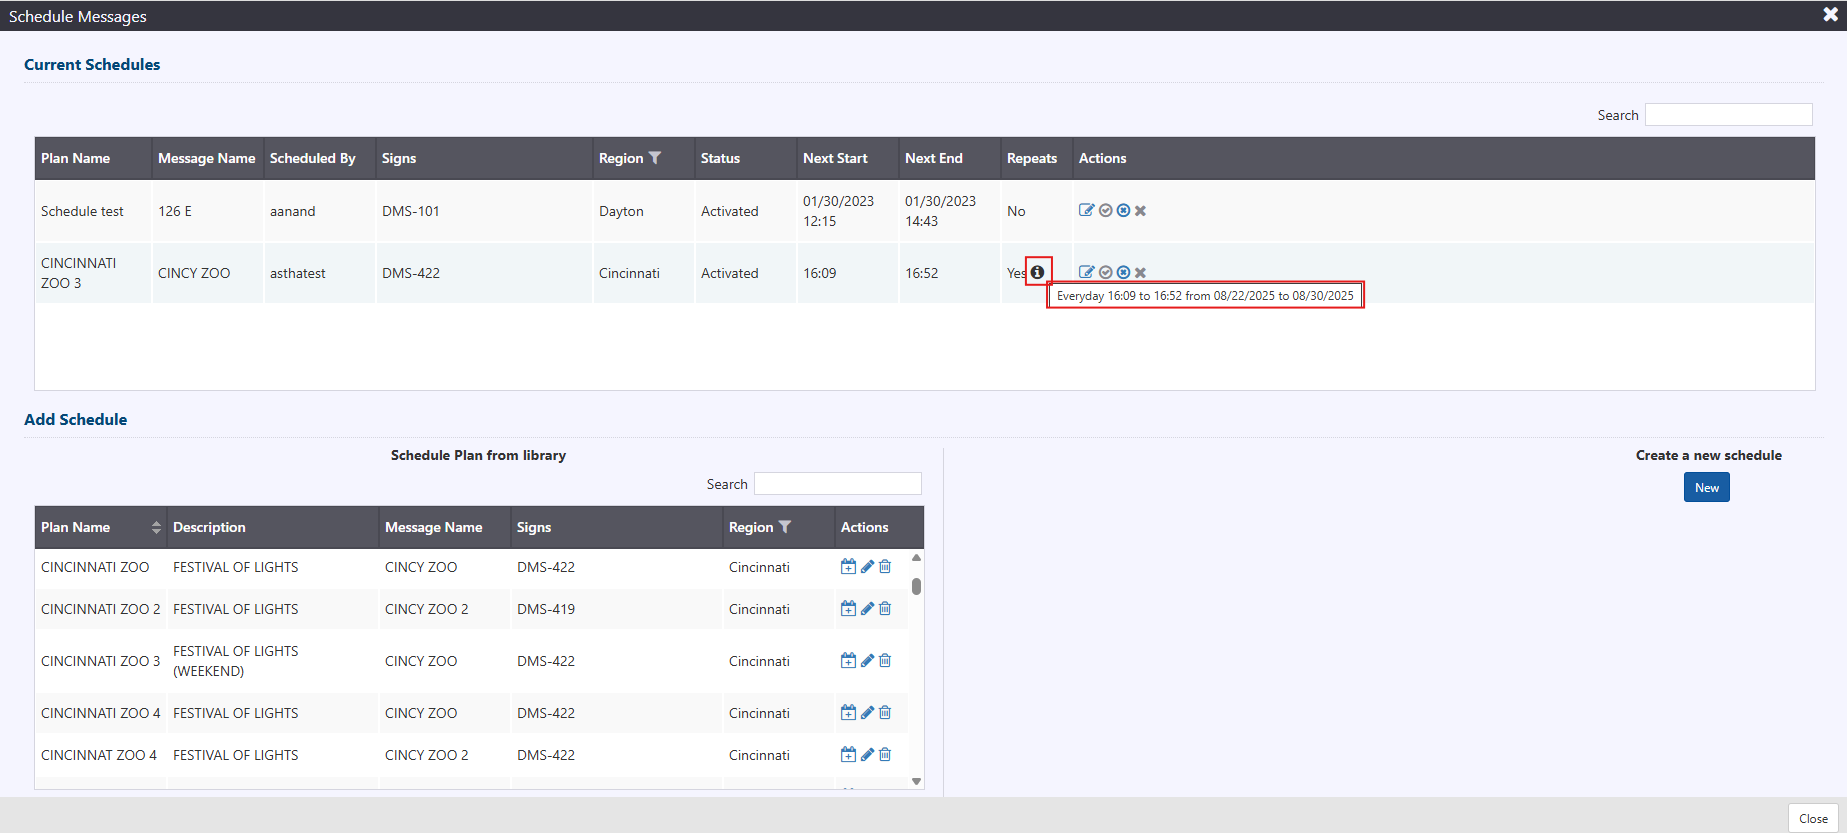
The Current Schedules table at the top of the screen contains a list of all schedules that are currently being managed by the ATMS. The Status column identifies whether the schedule is currently active (messages are in the queue for the identified signs) or not.
If the schedule is set to repeat, it will show Yes with icon under Repeats column indicating the repeat schedule.
Possible statuses include:
| STATUS | MEANING |
|---|---|
| Activated | The schedule is in an active period and the specified message has been added to the queue for all signs included in the schedule |
| Future | The schedule is not within one of its planned activation periods. The message is not in the queues for signs included in the schedule. |
You can Edit, Activate, Deactivate or Remove schedules using the buttons next to each entry in the Current Schedules table.
The bottom of the screen provides options to schedule a pre-built Message Plan from the library, or to create a new schedule. A Message Plan identifies:
- A message in the sign library (identified by name)
- A set of signs that should receive the message : these signs must all have a message by that name in the libraries for their respective Display Classes
The Message Plan Library also provides options to edit or delete message plans.
Schedule a Message Plan from the Library
You can add a new schedule using a Message Plan from the library of message plans from the Schedule Messages screen. You can use the Search box to find a message plan by name, description, message name or sign.
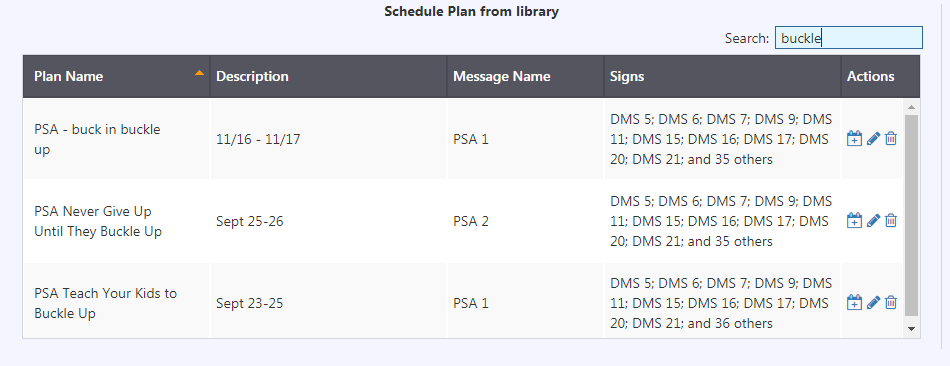
Click the button next to the desired message plan to activate it. The ATMS will open a confirmation screen that includes options to:
- Set the period(s) to display the message. See section Scheduling for details on how to define a schedule
- Indicate whether this message should be allowed to merge with other messages on each of the signs that are part of the plan. This will only be visible if the message is eligible to merge (see section Message Merging for details)
- Identify if the schedule should require user approval before activation or deactivation. If this option is checked, the ATMS will notify appropriate users when a period in which the message should be displayed starts or ends
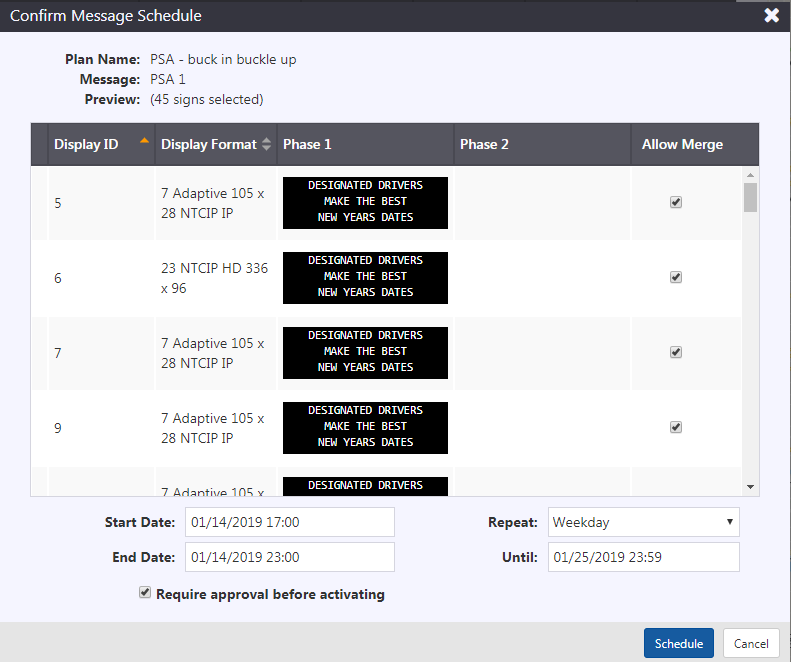
Click Schedule to finish adding the schedule.
Create a New Schedule
To schedule a message on a set of signs that aren't already captured by a message plan, click the New button under Create a new schedule.

To define a plan, first select a library message by name in the Select Message section of the screen. You can use the Search box and Category filter to narrow down the list of messages.
Once you have selected a message, the screen updates to show all signs that have a message by that name in their library, and a preview of what that message looks like. Use the checkboxes in the first column of the Select Signs section to select the desired signs, or the checkbox in the column header to select or unselect all signs. When you select a sign, it moves to the top of the list. You can search and sort the list to find the desired signs.
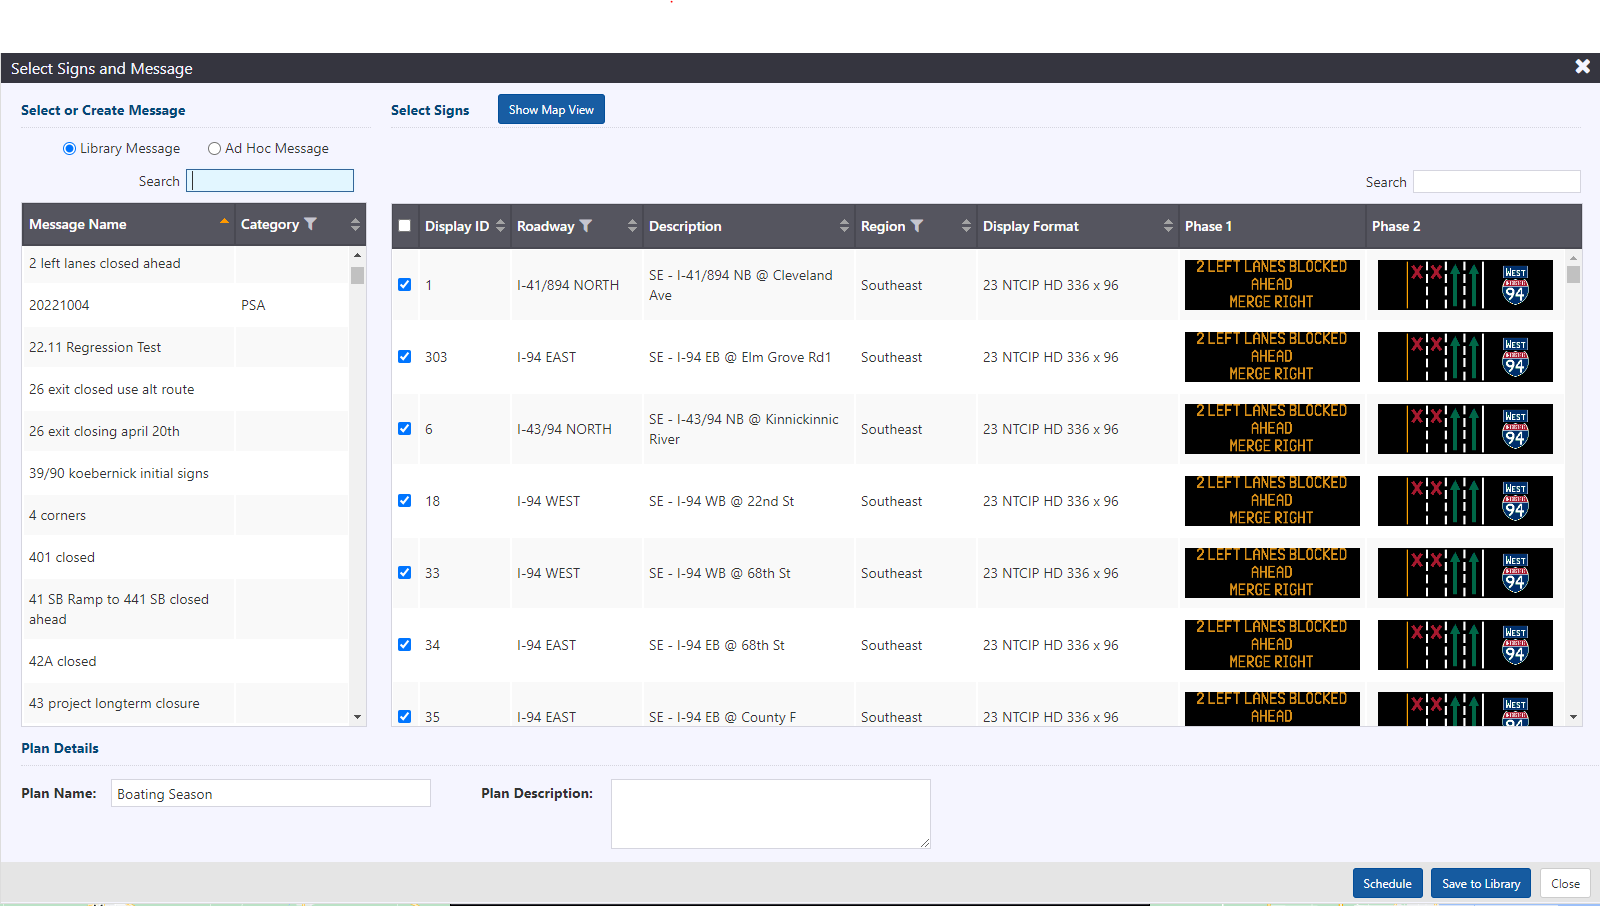
After selecting the desired message and signs, enter a Plan Name : this will be used to identify this schedule for later adjustment or removal. Optionally enter a description of the plan.
Define the schedule to use for this message. See section Scheduling for details on how to define a schedule.
Click Save to Library to optionally save the Message Plan to the library for later use.
Click Schedule to schedule it. The ATMS will open a confirmation screen that includes options to:
- Review and revise the schedule.
- Indicate whether this message should be allowed to merge with other messages on each of the signs that are part of the plan. This will only be visible if the message is eligible to merge (see section Message Merging for details).
- Identify if the schedule should require user approval before activation or deactivation. If this option is checked, the ATMS will notify appropriate users when a period in which the message should be displayed starts or ends.
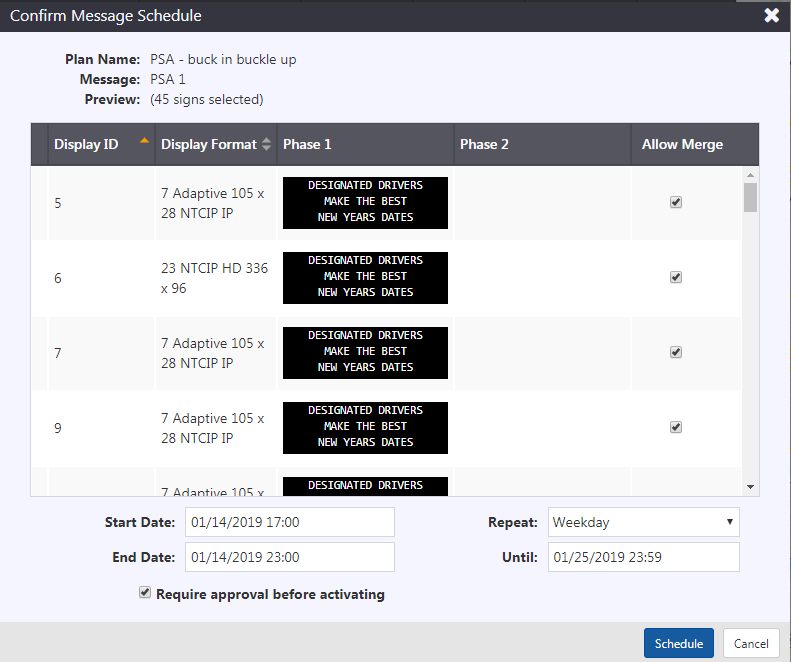
Click Schedule to finish adding the schedule.
Activate a Schedule
To activate a schedule, either:
- Click the
next to any schedule with a status of Future. The button will be grey (disabled) if the schedule is either ongoing or past its scheduled period
- Click the
next to any schedule with a status of Future and click Activate. The button will be grey (disabled) if the schedule is either ongoing or past its scheduled period
- Click View Schedule on the ATMS notification that indicates a schedule is ready to start and click Activate on the schedule screen
A schedule can be activated at any time that it is not in an Ongoing status (there is no need to wait for the scheduled time to activate the schedule).
When you activate a schedule, the ATMS adds the scheduled message to the queue for all specified signs.
You can only activate a schedule that you are the owner of. To take ownership of a schedule, click on the button next to the target schedule and select the Own option.
Deactivate a Schedule
To deactivate a schedule, either:
- Click the
next to any schedule with a status of Ongoing. The button will be grey (disabled) if the schedule is not Ongoing
- Click the
next to any schedule with a status of Future and click Deactivate. The button will be grey (disabled) if the schedule is not ongoing
- Click View Schedule on the ATMS notification that indicates a schedule is ready to end and click Deactivate on the schedule screen
A schedule can be deactivated at any time that it has a status of Ongoing (there is no need to wait for the scheduled time to deactivate the schedule).
When you deactivate a schedule, the ATMS removes the scheduled message from the queue for all specified signs.
You can only deactivate a schedule that you are the owner of. To take ownership of a schedule, click on the button next to the target schedule and select the Own option.
Edit a Schedule
To edit a schedule, click the next to any schedule. Update the scheduled period(s), the message and/or the signs to include and click Schedule.
The ATMS will open a confirmation screen that includes options to:
- Review and revise the schedule.
- Indicate whether this message should be allowed to merge with other messages on each of the signs that are part of the plan. This will only be visible if the message is eligible to merge (see section Message Merging for details)
- Identify if the schedule should require user approval before activation or deactivation. If this option is checked, the ATMS will notify appropriate users when a period in which the message should be displayed starts or ends
Click Schedule to save your changes to the schedule.
You can only edit a schedule that you are the owner of. To take ownership of a schedule, click on the button next to the target schedule and select the Own option.
Delete a Schedule
To Delete a schedule, click the next to the target schedule and select the Delete option. A schedule must be Deactivated before it can be deleted.
You can only delete a schedule that you are the owner of. To take ownership of a schedule, click on the
button next to the target schedule and select the Own option.
Manage the Message Library
Edit a message
To edit a message, click on the next to the desired message in the message library of a sign (see section Sign Properties for details). Modify the text, graphics and/or category of the message and click Save to Library.
Remove a message
To remove a message from the library, click on the button next to the desired message in the message library of a sign (see section Sign Properties for details). This will remove the message from the library for all signs with the same Display Class as the current sign.
Create a message from a copy of an existing message
To create a message from a copy of an existing library message, click on the button next to the desired message in the message library of a sign (see section Sign Properties for details). This will open the message editor containing a message with the same text and graphics as the original message. Modify the text and/or graphics of the message, enter a Name and optional Category and click Save to Library.
Create or Edit Message Plans
Edit a Message Plan
To edit a message plan, open either the Post Multiple or Message Schedule screen, and click the button next to the plan you would like to edit in the Plan Library. Modify the selected message and signs as needed and click Save to Library.
Remove a Message Plan
To remove a message plan, open either the Post Multiple or Message Schedule screen, and click the button next to the plan you would like to remove from the Plan Library.
Manage Approved Words
The ATMS validates all new DMS messages against a set of Approved Words. A message that includes one or more words that are not in the Approved Words list or the configured road, exit, interchange, county or landmark names cannot be saved to the message library or posted to a sign.
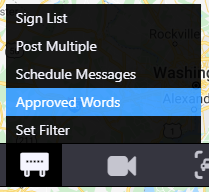
To access the Approved Words list, right click on the DMS icon on the Action Panel and select Approved Words.
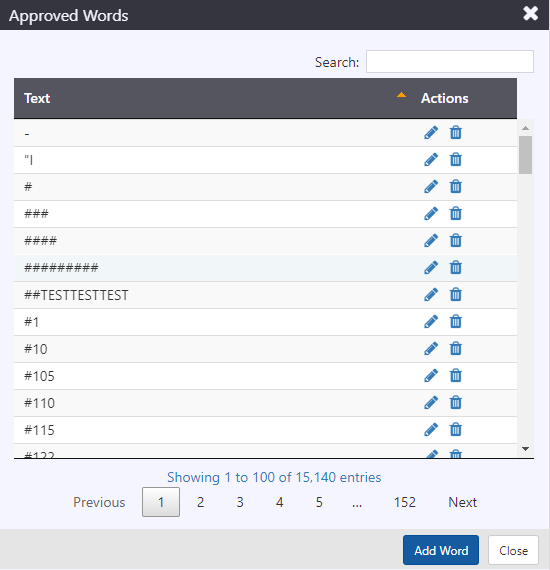
The list can be searched and sorted by the text of each word. You can add, edit or remove words from the list.
Add an Approved Word
To add an Approved Word, click button. Add the new word and click on Add button.
The ATMS will display an error message if the word you are trying to add already exists in the Approved Words list.
Edit an Approved Word
To edit an Approved Word, find the desired word in the list and click on the button next to it.
Enter the new text into the text box by replacing the existing text and click Continue, else click Cancel.
Remove an Approved Word
To remove an Approved Word, find the desired word in the list and click on the button next to it.
Set Filter
Set Filter allows for filtering signs that are displayed in the current map view. To access the Set Filter, right click on the icon on the Action Panel and select Set Filter.
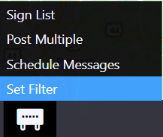
Sign Map Filter allows for filtering signs displayed in the current map view, based on Sign Types and Sign Status. Sign can be selected for display by clicking appropriate check boxes . Sign Types available for selection are PCMS and Travel Time Signs. For signs selected based on sign type, future filtering based on sign status can be applied. Sign status options include OK, Disabled, Communication Failure, Warning, and Fault.
When Sign Map Filter is applied, DMS icon will show a small orange filter.
Enable or Disable a Sign
When a sign is Disabled, the ATMS stops communicating with it, messages can be added or removed from the sign's queue, but they will not be posted, and the ATMS will not check the status of the sign. The sign icon and current message update to indicate the sign is disabled.
You can Enable or Disable a sign from either its Sign Properties view or from its entry in the Sign List.
To Enable or Disable a sign from its Sign Properties view, open the view for the desired sign either from the map icon, or the Sign List. Only one of the Enable or Disable buttons will be active, and the other will be grey/inactive, based on the current state of the sign. Click on the Enable or Disable button to turn the sign on or off in ATMS.

To Enable or Disable a sign from the Sign List, open the Sign List and find the desired sign. Click on the button to open the menu for that sign. Only one of the Enable or Disable menu options will be active and the other will be grey/inactive, based on the current state of the sign. Click on the Enable or Disable menu option to turn the sign on or off in ATMS.

Enable or Disable Multiple Signs
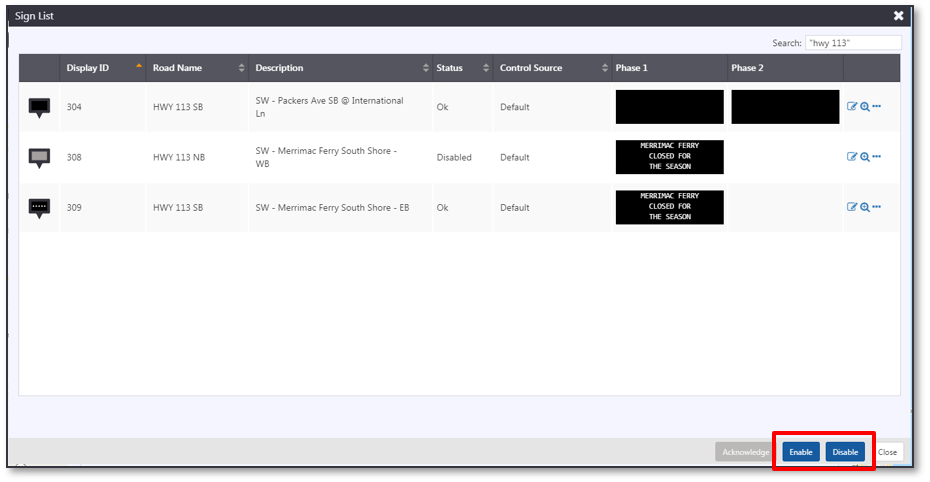
You can Enable or Disable multiple signs using the buttons at the bottom of the Sign List. Use the Search box to (optionally) filter the list to the set of signs to be enabled or disabled. The Enable button at the bottom of the list view will be active if any of the signs displayed in the list (based on your search) are disabled. The Disable button at the bottom of the list view will be active if any of the signs displayed in the list are enabled. Click Enable or Disable to turn all the signs displayed in the list on or off in ATMS.
Message Merging
The ATMS can combine two single phase messages into one two-phase message for posting to a sign. For two messages to merge, they must both be:
- Single phase messages
- Message types that are allowed to merge based on system configuration
- Not be named messages that are included in the system configured list of messages that should never be allowed to merge
The Message Queue tab of the Sign Properties view shows all messages that are currently in the queue for the sign, as well as the Target Message the ATMS has posted (or is trying to post) to the sign. This Target Message could be the result of two messages being merged. The Target Message will always include the highest priority message in the queue, and if it can merge, will do so with the next highest priority message in the queue that it is eligible to merge with.
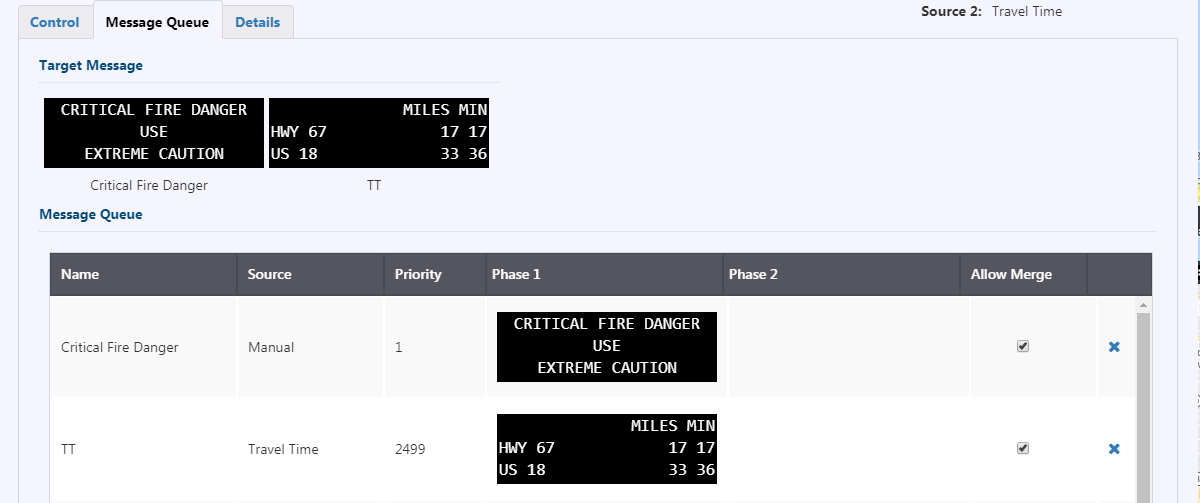
You can identify whether specific messages should be allowed to merge when adding manual messages to a sign (either to a single sign or multiple), when scheduling messages, or when accepting the DMS portion of an event response plan. To enable or disable merging for one or more messages that have already been added to the queue, click the Allow Merge checkbox next to the message in the message queue. The system will modify the Target Message automatically if needed.
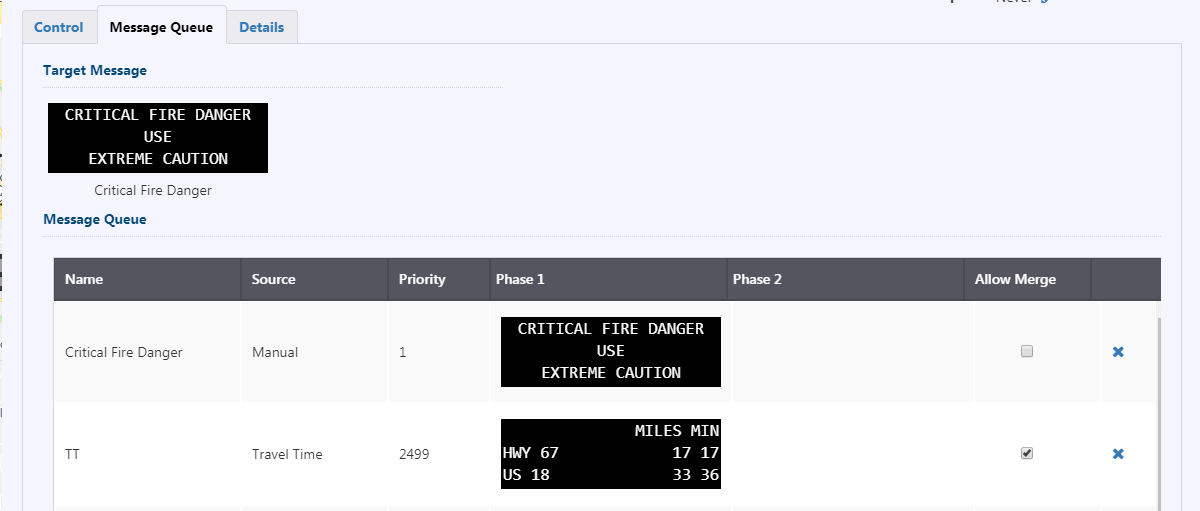
The Sign Properties view also shows the source of both messages included in the message that has been sent to the sign if it is the result of a merge operation.

Relocate PCMS
Move PCMS
You can relocate a portable message sign by right-clicking the sign icon and selecting Move Sign. Selecting this option changes the sign icon to a moving state:
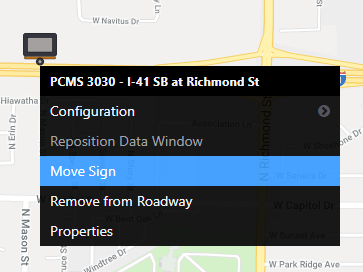
Drag the moving sign icon to a new location. When released, the system will ask you to select the signs new location. Press Cancel to continue moving, or select the roadway from the list. Only nearby roads configured in the system will appear. Enter a new description for the sign based on its new location and click Relocate to complete the move.
Remove PCMS from Roadway
A sign that is being moved to storage can be removed from the map. Right-click the sign icon and select Remove from Roadway. The system will prompt you to confirm that the sign should be removed from the map.
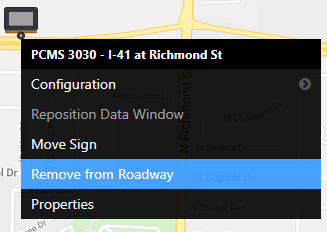
Return PCMS to Roadway
A sign that is removed from the map appears only in the Sign List with a Description of Off Roadway. Signs can be returned to the map from the sign list by selecting the menu at the right of the list and choosing Return to Roadway. The system will prompt for the sign location, including roadway, mile marker/reference location, and description.

Hybrid Sign
Add Hybrid Sign
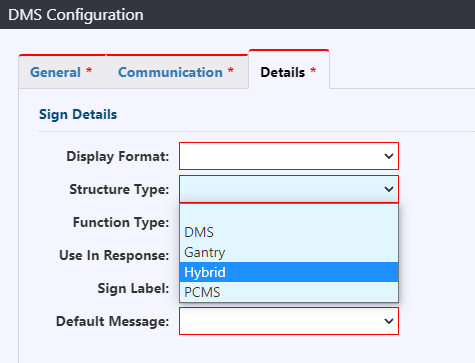
A Hybrid sign can be added like any other DMS or PCMS sign by selecting Structure Type as Hybrid. See section Message Merging for more details.
Relocate hybrid sign on map
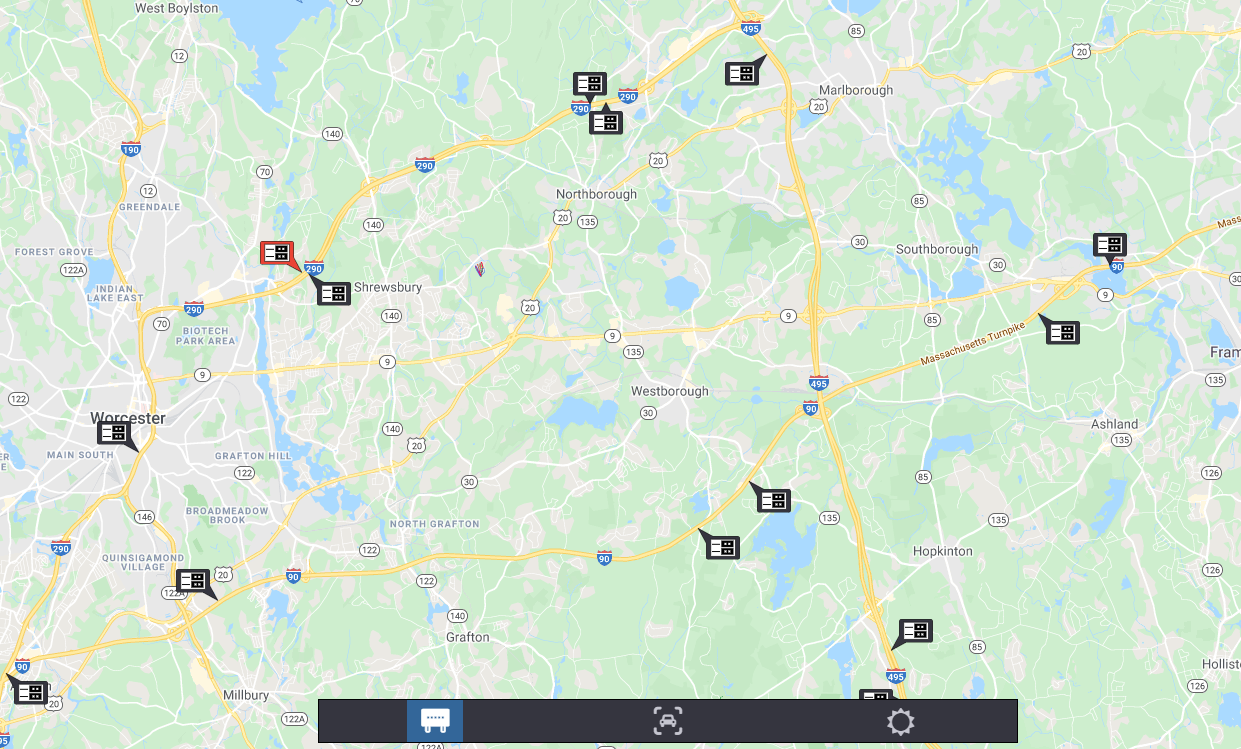
Added hybrid sign can be viewed as on the navigation map.
Manage hybrid sign
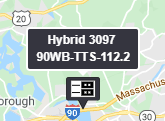
Sign name and description could be viewed by hovering the sign icon on the map.
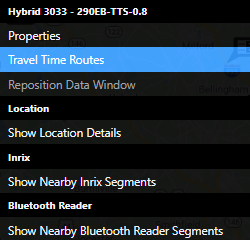
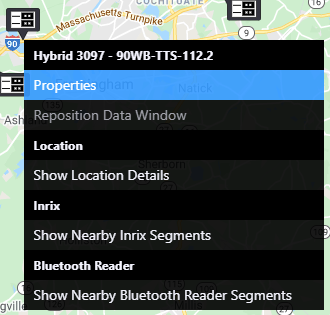
Sign properties can be accessed from map by clicking right on the sign icon.
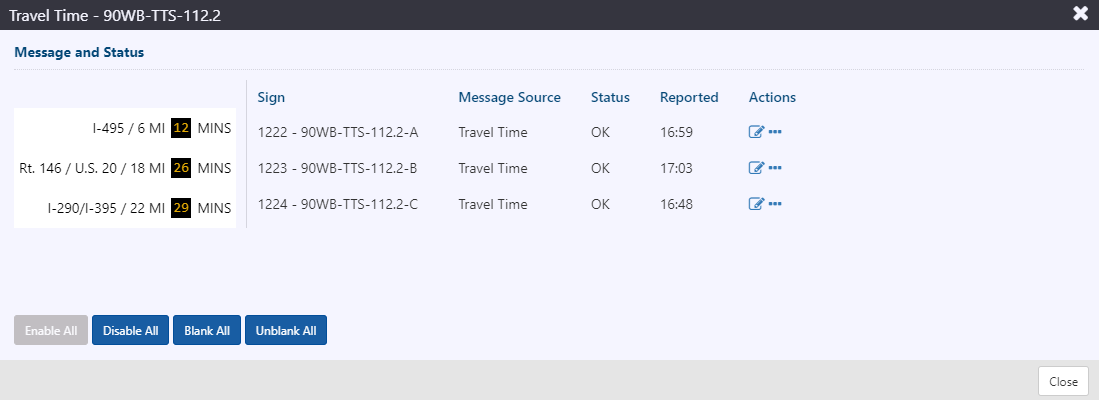
Signs can be configured by clicking under Action column.
Display Travel Time Routes
Travel time routes displayed on a specific sign can be accessed from map, by clicking right on the sign icon. Travel time route data displayed on the sign can be viewed by clicking Travel Time Routes. Refer to Traffic Data Conditions for details.
